
Why Grow Dandelions in Pots for Edible Greens and Flowers?
Imagine harvesting fresh, vibrant greens and sunny yellow flowers right from your balcony or windowsill. Dandelions are more than just weeds — their leaves pack a bitter-sweet flavor perfect for salads and sautés, and their flowers add a splash of color and nutrients to your dishes. Growing them in pots means you control soil quality, avoid pesticides, and enjoy fresh harvests year-round. Plus, dandelions thrive in small spaces and need surprisingly little fuss. You can absolutely do this, even if all you have is a tiny urban nook. Step-by-step, I’ll show you how to grow sturdy, flavorful dandelions successfully, troubleshoot common problems, and turn minimal space into a rewarding mini-garden.
Getting Ready — What You’ll Need
Before you dig in, gather your essentials. Here’s the full list and why each item matters:
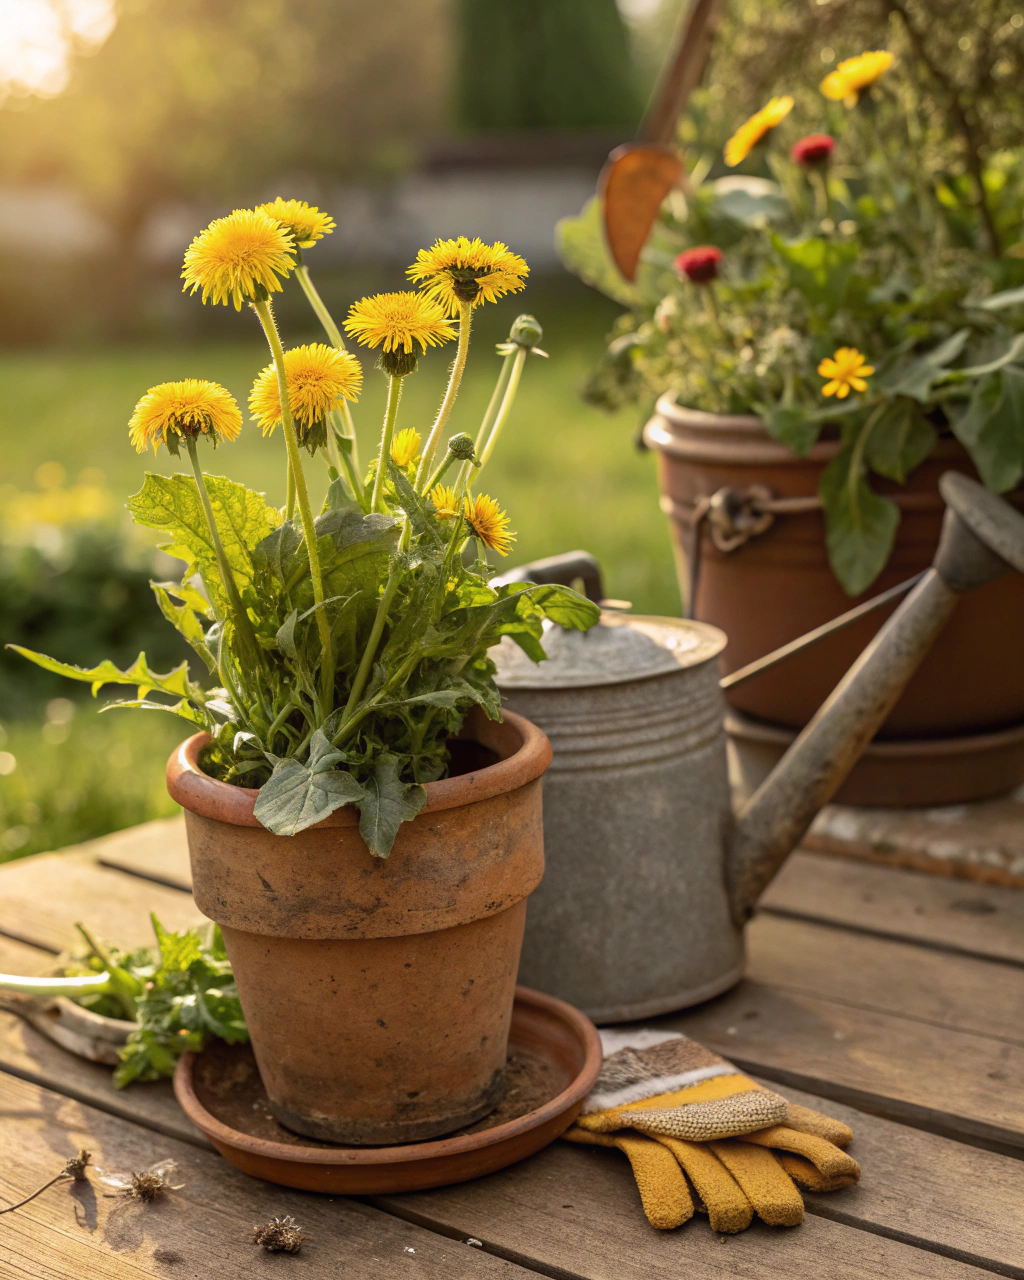
- Container: Minimum 30 cm (12 in) deep and 25-30 cm (10–12 in) wide. Dandelions develop deep taproots, so depth is key. Choose sturdy plastic, terracotta, or fabric pots. (If your climate is hot, use clay pots to help keep roots cool.)
- Potting mix: A well-draining soil blend — ideally 70% loam, 20% compost, and 10% coarse sand or perlite. Loam holds nutrients well; compost feeds the plants, and sand improves drainage.
- Seeds or seedlings: Select edible dandelion varieties such as Taraxacum officinale or the cultivated Taraxacum erythrospermum. Seeds are easy to find online or at specialty nurseries.
- Fertilizer: Choose a balanced, low-nitrogen fertilizer with an NPK ratio around 5-10-10. This encourages leafy growth without excess bitterness.
- Watering can or spray bottle: Precise moisture control is critical — too much water means root rot, too little slows growth.
- Light source: Dandelions love 6–8 hours of direct sunlight daily. If indoors, a south-facing window or supplemental grow light will do.
- Garden tools: Small trowel, scissors or garden shears, gloves. Tools keep your work tidy and your plants healthy.
- pH tester (optional): Ideal soil pH is between 6.0 and 7.5. You can test soil easily with a kit or strips.
Pro tip: If your budget is tight, recycle clean yogurt containers (punched for drainage) or upcycle old wooden boxes. Just make sure your homemade pots drain well and provide enough space.
Step-by-Step — How to Grow in Pots
1. Preparing Your Pot
Let’s start by setting the stage for healthy roots. Begin by cleaning your container thoroughly — no soil residues or bugs from previous uses. Place a drainage layer at the bottom using small stones or broken terracotta shards about 2–3 cm (0.8–1.2 in) deep. This prevents water from pooling at the roots, which leads to rot.
Next, fill the pot with your soil mix up to about 4 cm below the rim. The soil should feel moist but not soggy — like a sponge that’s been wrung out. Fluff the soil by mixing lightly; avoid packing it too tightly. Compacted soil squeezes roots and limits oxygen, which stunts growth.
Watch out: Pots without drainage holes are a common mistake. No drainage leads to soggy soil and root rot. Plus, avoid overly acidic or alkaline soil; it’ll hamper nutrient uptake.
2. Sowing or Planting
Dandelion seeds are tiny and best sown shallowly. Sow seeds just under the surface at a depth of 0.5–1 cm (about ¼ in). Space seeds or seedlings about 5 cm (2 in) apart to allow room for leaves to expand. The ideal soil temperature for germination is between 15–20°C (59–68°F). If you start indoors in early spring, use a heating mat to keep soil warm.
Before planting, soak seeds in lukewarm water for 6–8 hours to soften seed coats and speed up germination. When sowing, the soil should feel soft and cool to the touch.
Pro tip: Lightly cover the seeds with fine compost or vermiculite—not soil—so they get enough light, which aids germination.
3. Watering and Sunlight
Water newly sown seeds gently but thoroughly. Aim for moist soil without puddles. Water deeply until you see moisture seeping from the drainage holes — this usually means about 2–3 times per week depending on weather. In hot or windy conditions, dazzle your dandelions by grouping pots to create a humid microclimate, and mulch the soil surface with straw to slow moisture loss.
Dandelions are sun lovers. Position your pot where it receives at least 6–8 hours of direct sunlight. In cloudy climates, supplement with a full-spectrum grow light for 12–14 hours daily. If outdoors, partial afternoon shade provides relief during scorching summers.
4. Feeding and Maintenance
Regular feeding keeps your dandelions lush and flavorful. Apply fertilizer every 3–4 weeks, using a liquid feed diluted to half strength, or sprinkle a slow-release mix on top of the soil. Avoid high nitrogen fertilizers; they can make leaves too bitter and promote excessive leaf growth at the expense of flowers.
Thin seedlings when they reach about 5 cm tall, leaving the strongest plants spaced at least 8 cm (3 in) apart. Prune regularly by snipping the outer leaves; this encourages bushier growth.
Keep soil aerated by gently loosening the surface with a small fork every few weeks. This prevents crusting and improves oxygen supply to roots. Keep an eye out for signs of stress: yellowing leaves or wilting might mean overwatering or nutrient imbalance.
“The secret is not more work — it’s regular care and observation.” This little mantra has served me well when growing dandelions and many other plants. It’s your daily habits that make all the difference.
5. Troubleshooting While They Grow
Even the best gardeners face issues — here’s how to tackle common problems as they arise:
- Yellow leaves: Usually a sign of excess nitrogen. Switch to a fertilizer higher in phosphorus and potassium to balance leaf and flower development.
- Stunted growth: Often caused by insufficient light or compacted soil. Move pots to sunnier spots and aerate soil gently.
- Wilted or soggy soil: Drainage issues — double-check holes and reduce watering frequency. Remove top soil if mold develops.
- Pests: Aphids and snails can be common. Spray leaves with a strong water jet or use organic neem oil. Hand-picking snails works wonders too.
- Poor germination: Seeds buried too deep or dried out. Sow shallowly and ensure consistent moisture.
6. Harvesting
Your first harvest will come between 70 and 90 days after sowing. Look for leaves that are bright green, firm to the touch but tender, and no larger than 15 cm (6 in) long. Flowers will emerge as sunny yellow blooms with a soft, slightly fuzzy texture.
A little trick to enhance leaf flavor is to reduce watering a week before harvesting — this concentrates sugars and softens the bitterness.
Harvest leaves by snipping from the outer edges first, allowing the center leaves to keep growing. If you want the roots, gently loosen soil and pull the entire plant, feeling for a firm, crisp taproot.
Store harvested greens in a cool, dark place at about 4–7°C (39–45°F) inside a sealed plastic bag or container for up to 2 weeks. Flowers are best used fresh but can be refrigerated similarly for 3–4 days.
Extra Tips for Perfect Results
- Grow companion plants like chives, parsley, or marigolds to deter pests and enhance growth.
- Rotate your pots or switch out soil mixtures each season to avoid nutrient depletion and build healthy soil life.
- Mulch with straw, dried leaves, or shredded bark to retain humidity and keep soil temperatures stable.
- Whenever possible, use collected rainwater for watering — it’s softer and less likely to cause soil hardening.
- Cluster pots together especially in windy spots to reduce evaporation and protect tender leaves from damage.
- In scorching midday sun, provide light shade with a breathable fabric to prevent leaf scorch and maintain moisture.
Common Mistakes and How to Fix Them
- Overwatering: Leads to soft, rotting roots. Remedy by letting the top 2 cm of soil dry completely before watering again.
- Insufficient light: Causes weak, leggy growth. Move pots to a sunnier location immediately.
- Using the wrong fertilizer: Excess nitrogen causes overly bitter leaves and yellowing. Switch to a balanced formula with more phosphorus.
- Sowing seeds too deep: Limits germination — keep sowing depth to 0.5–1 cm.
- Compacted soil: Roots struggle in heavy, poorly-aerated soil. Always mix in 10% sand or perlite to improve texture and air flow.
Harvest and Storage
Harvest with care—use sharp scissors or garden shears. Snip outer leaves and flowers individually to keep plants producing longer. For root harvest, wait at least 90 days, loosen soil gently, and pull roots slowly to avoid breakage.
Store harvested greens at ideal temperatures of 4–7°C (39–45°F) in dark, humid conditions within breathable containers to prevent wilting. Leaves last up to 2 weeks, flowers about 3–4 days. For more longevity, dry flowers in airy shade for teas or freeze chopped leaves in airtight bags for up to 6 months.
Don’t forget to save seeds from mature dandelions to sow next season. Allow flower heads to go to seed, collect when dry, and store in a cool, dry place.
What Success Looks Like
Picture this: you gently pull a firm, slightly fragrant dandelion root from your pot. The cool, earthy scent fills your hands, and the bright green leaves feel crisp and alive. That feeling, the reward, is what makes every careful step worth it. Expect to harvest around 1–2 kg (2–4 lb) per container over a season, enough for fresh meals and garnishes.
Consistency matters more than perfection. Notice subtle changes, learn from your plants, and enjoy the quiet connection with nature you build with each leaf. This hands-on care is the heart of successful gardening — and it’s deeply satisfying.
Mini Recap — Your Success Checklist
- Pot depth: 30 cm (12 in) minimum
- Soil mix: 70% loam, 20% compost, 10% sand
- Watering: 2–3 times per week (adjust by touch)
- Sunlight: 6–8 hours per day
- Fertilizer: every 3–4 weeks, low nitrogen
- Harvest: 70–90 days after sowing
Closing Reflection
Remember, success with potted dandelions doesn’t come from achieving perfection right away. It builds slowly, like your growing plants, through small, consistent acts of care. Each leaf you harvest teaches you more about patience, observation, and nurturing life. Take your time. Watch closely. Adjust when needed. Most importantly, enjoy every moment in your green space. That’s what makes you a gardener.

Hi there — I’m Ava, the creator behind Ava Garden Tips 🌿
I’ve always been passionate about plants, flowers, and the simple joy that comes from growing something beautiful. What started as a small balcony garden has turned into a love for helping others create their own green spaces — no matter how big or small.