
Why Grow Garlic Chives in Pots?
Garlic chives are a fantastic addition to your container garden if you want a fresh, subtle onion flavor without the overpowering bite of regular onions. They’re easy to grow and incredibly versatile in the kitchen, enhancing everything from salads to stir-fries. You can grow them on a small balcony, windowsill, or patio — no large garden required. Plus, their grass-like leaves add a lovely vibrant green splash to any space. With clear, practical steps and simple solutions for common challenges, you’ll soon have a thriving pot of garlic chives that’s always within arm’s reach. Trust me: you can do this, even if you’re a beginner or short on space.
Getting Ready — What You’ll Need
Before we dive in, let’s make sure you have all the essentials lined up. Here’s what you’ll need to set yourself up for success:
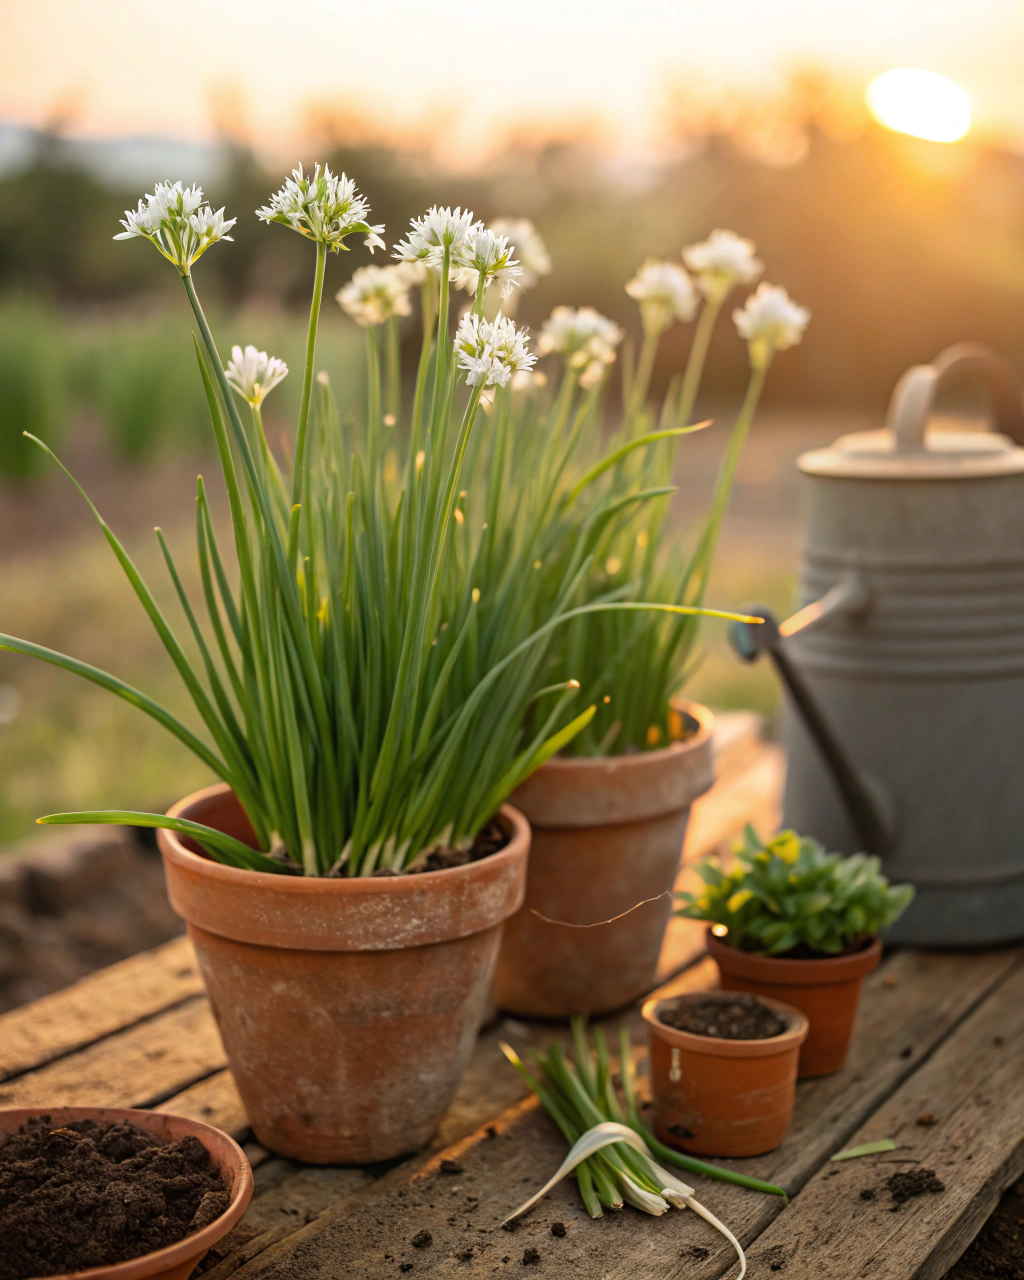
- Container: Choose a pot at least 30 cm deep (12 inches), with drainage holes. Garlic chives have roots that spread a little, so deeper containers work best. (If your area gets hot, consider clay pots—they keep roots cooler.)
- Soil: A rich, well-draining potting mix. Aim for about 70% loam, 20% compost for nutrients, and 10% coarse sand or perlite to improve aeration and drainage.
- Garlic chive seeds or seedlings: Look for varieties like ‘Nikko’ or ‘Long White’, known for tenderness and good flavor. Seeds are more economical; seedlings give a faster start.
- Fertilizer: Use a balanced, low-nitrogen fertilizer like 5-10-10 NPK or organic options such as worm castings or liquid seaweed. (Avoid high nitrogen fertilizers to prevent excessive leaf growth with weak flavor.)
- Watering equipment: A watering can with a fine rose or a gentle hose nozzle to avoid displacing soil.
- Light source: Garlic chives need 6–8 hours of direct sunlight daily — a sunny balcony or south-facing window is ideal.
- Gardening tools: Hand trowel, gloves, and scissors or garden shears for harvesting.
Optional tips: If you want to be eco-friendly or low-budget, use reclaimed pots, homemade compost, and collect rainwater for irrigation. A simple homemade shade cloth can help protect your pots in the hottest months.
Step-by-Step — How to Grow Garlic Chives in Pots
1. Preparing Your Pot
Start by thoroughly cleaning your container to remove old soil or pathogens—scrubbing with warm soapy water works well. Next, create a drainage layer at the bottom using about 2–3 cm (1 inch) of small gravel or broken terracotta. This prevents water from pooling, which can cause root rot.
Fill the pot with your soil mix. You want it loose and crumbly but moist — think of a sponge that’s been gently wrung out. If you squeeze it, a little water should emerge, but the soil shouldn’t glop or drip. Avoid compacting the soil; this suffocates roots and slows growth.
One common mistake is skipping the drainage holes or covering them—always ensure water can flow freely. Another is using heavy garden soil, which’s prone to compaction. Stay light and airy.
2. Sowing or Planting
If you’re starting with seeds, plant them at a depth of about 0.5-1 cm (¼ inch), spaced about 5 cm (2 inches) apart. A temperature of around 18–22°C (64–72°F) is ideal for germination, which usually happens in 7–14 days. Pretreating seeds with a brief soak (about 4 hours) in lukewarm water can help soften the seed coat and speed sprouting.
When sowing, gently firm the soil above the seeds, but don’t press down hard. The surface should feel smooth but not compacted. You want to see an evenly moist bed. A pro tip: cover the pot with a fine mesh or clear plastic dome initially. This maintains humidity and warmth, boosting germination.
If you’re transplanting seedlings, space them at least 10 cm (4 inches) apart to give each plant room to stretch.
3. Watering and Sunlight
Water is crucial, but it’s easy to overdo it. Water deeply enough so moisture reaches the bottom of the pot but avoid soggy soil. Typically, watering 2–3 times per week in warm weather works well. Feel the soil’s top 2 cm—if it’s dry, it’s time to water.
In hot, dry, or windy areas, water early morning to reduce evaporation and consider grouping pots together to maintain a humid microclimate. Mulching around the base with straw can also keep moisture in. If your spot is prone to scorching sun, partial shade during the hottest hours is fine.
Garlic chives thrive with 6–8 hours of direct sunlight daily. If you’re in a very cloudy region, position the pot by a bright window and supplement with a grow light if possible. Less light leads to weak growth and less flavorful leaves.
4. Feeding and Maintenance
Fertilize every 3-4 weeks during the growing season. Garlic chives appreciate a steady nutrient supply but too much nitrogen leads to floppy leaves without that characteristic punch. Use a balanced fertilizer like 5-10-10 or organic options with higher phosphorus and potassium.
Thin seedlings if they’re overcrowded—pull the weaker ones out so the remaining plants have at least 10 cm (4 in) space. Regularly prune the leaves by snipping what you need for cooking; this encourages fresh new growth. Keep an eye on soil aeration; if it seems compacted, gently loosen the top with a fork to help oxygen reach the roots.
“The secret is not more work — it’s regular care and observation.” That’s been my experience with garlic chives: consistent attention pays off more than trying to fix problems later.
5. Troubleshooting While They Grow
Here are some quick fixes for common issues:
- Yellow Leaves: Usually a sign of too much nitrogen or overwatering. Switch to a fertilizer with more phosphorus or reduce watering frequency.
- Stunted Growth: Not enough light. Move the pot to a sunnier spot or increase artificial light.
- Pests: Look out for aphids or slugs. Aphids can be sprayed off with water or soapy solution; slugs can be trapped or deterred with copper tape around pots.
- Soil Staying Too Wet: Check the drainage holes aren’t blocked; add more sand or perlite if soil is retaining too much water.
- Weak or Pale Plants: Could mean nutrient deficiencies. Apply a compost tea or diluted liquid fertilizer to give them a boost.
6. Harvesting
You’ll be ready to harvest in about 70–90 days after sowing, depending on conditions. The leaves should be a deep, vibrant green and firm to the touch. When snipping, cut at least 5 cm (2 inches) above the soil to encourage new growth.
If you want to enhance flavor, reducing watering during the last week encourages concentration of oils in the leaves. When pulling or cutting, you should hear a faint snap or feel a clean cut—avoid tugging hard to keep roots intact.
Harvest in the morning when oils are strongest. Store fresh chives wrapped lightly in a damp paper towel inside the refrigerator at around 4–7°C (39–45°F); use within 7–10 days for best flavor.
Extra Tips for Perfect Results
- Companion plants: Grow with lettuce, radishes, or carrots. Garlic chives deter pests and improve flavor of nearby crops.
- Rotate your pots each season to prevent soil nutrient depletion and disease buildup.
- Mulch with straw or fallen leaves to keep humidity steady and weeds low.
- Whenever possible, use collected rainwater—it’s softer than tap water and friendly to your soil life.
- In windy areas, group your containers to improve stability and share moisture.
- During very hot periods, use a thin fabric shade cloth over your pots between noon and 3 p.m. to protect tender leaves.
Common Mistakes and How to Fix Them
- Overwatering: Roots become soft and rot quickly. Solution: Let the top 2 cm of soil dry before watering again.
- Weak growth: Insufficient light. Move your pot to a sunnier location.
- Yellow leaves: Too much nitrogen causing imbalance. Switch to fertilizer with higher phosphorus ratio.
- Poor germination: Seeds sown too deep. Always plant at less than 1 cm depth.
- Misshapen roots: Compacted soil restricting airflow. Mix in coarse sand or perlite when prepping soil.
Harvest and Storage
When harvesting, gently cut or pull leaves without disturbing the roots too much—this promotes continuous regrowth. Store fresh garlic chives at a cool temperature between 4–7°C (39–45°F) with about 70% humidity. They keep fresh for up to 2 weeks. For longer storage, you can dry the leaves in a shaded, airy spot, freeze in small bundles, or pickle them in vinegar or oil.
Don’t forget to save seeds for next season. Let seed heads dry fully on the plant, then collect and store in a cool, dry place until you’re ready to plant again. This way, your garlic chives are always ready to grow.
What Success Looks Like
When you finally pull your first handful of garlic chives, you’ll notice how firm, deep green leaves reflect tender new growth. Their fresh, garlicky fragrance is subtle but unmistakable — a quiet celebration of your care and patience. Expect a yield of about 1–2 kg (2–4 lb) per large container over the growing season if properly maintained.
It’s not just the harvest — but the consistency, the small victories, and the connection with your plants that make gardening so rewarding. Each cut leaf is a reminder that your steady attention brings life and flavor into your home.
Mini Recap — Your Success Checklist
- Pot depth: Minimum 30 cm (12 in).
- Soil mix: 70% loam, 20% compost, 10% sand or perlite.
- Watering: Deep watering 2–3 times per week, adjust based on soil feel.
- Sunlight: At least 6–8 hours/day.
- Fertilizer: Balanced, low nitrogen, every 3–4 weeks.
- Harvest: Begin at 70–90 days after sowing.
Closing Reflection
Remember, gardening isn’t about perfection. It’s about attention, patience, and small consistent acts tending your plants. Every garlic chive you nurture teaches you something new — how to observe, adjust, and connect with the life growing right before you. Don’t rush it. Enjoy the process and the quiet satisfaction when your pot is full of fresh, subtly onion-flavored leaves. That’s the true reward of gardening.

Hi there — I’m Ava, the creator behind Ava Garden Tips 🌿
I’ve always been passionate about plants, flowers, and the simple joy that comes from growing something beautiful. What started as a small balcony garden has turned into a love for helping others create their own green spaces — no matter how big or small.